 Since the introduction of fish finders in the fishing industry, multiple manufacturers started making it. Among all the manufacturers, Garmin is the leading fish finder today, so obviously, it makes sense why a lot of anglers are looking forward to learning how to read a Garmin fishfinder.
Like other most popular fish finders available in the market, Garmin models also use sound navigation and sonar techniques to detect underwater structures and fish. The first thing you are supposed to know is that their displays are mostly personalized, so even if this is not your first time using a fish finder, you might still face some trouble operating the Garmin model. However, getting your hands on a Garmin fish finder is not rocket science.
In the fishing business, you may agree that a fish finder is the most essential fishing equipment among all other items like fishing headlamps, or fishing drones or sunglasses. This article will guide you on using the Garmin fish finder in such a manner that will maximize the benefits of your fishing experience.
How to read Garmin fishfinder with ease?
Advanced fish finders like a Garmin are surely considered some of the best available on the market. Currently, They also specialize in making some of the best portable fish finders available. Garmin FishFinders are mostly easy to use and help you find fish with ease.
Though you are a novice, it will not take much time to become a pro at finding fish with Garmin fish finders. Plus, they are reliable, durable, and give clear images of what’s beneath the surface. In order to maximize the benefit of your Garmin fishfinder, first, you need to learn how to read it.
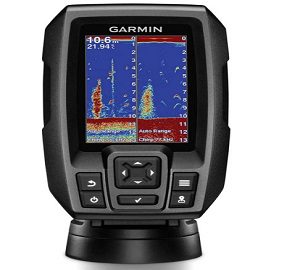
Press the button to turn on the device
It’s just not that complicated to read a fish finder if you focus properly on the screen. In order to see the screen, you need to turn on the Garmin fish finder by pressing the power button. Many inexperienced anglers are confused about the button and tend to waste some time finding it. Just keep in your mind that the button with the red circle is the power button.
Figure out the depth and temperature of the water
Once you have turned on the Garmin fish finder, look closely at the screen’s upper left corner. you would see some number shown at the top that shows the depth of the water. Like other modern fish finders, Garmin fish finders also use the imperial system of measurement. So, most probably you will see the depth of water in feet.
Now, look at the upper left corner of your device screen, you will also notice another number that clearly shows the temperature of the water. Keep in mind while using a Garmin fishfinder device that the temperature is shown in Fahrenheit only.
Understand the underwater geography
In order to properly learn how to read a Garmin fishfinder, it is important to focus on the signs or lines that extend off the surface. These signs or lines tell the geography of the surface ranging from plants to rocks under the water. The small and dark-coloured hump signs show rocks, whereas the taller lines detect the submerged trees.
While reading, keep in mind that trees indicating lines should always be a little darker than the small plant indicating lines. Therefore, make sure to pay close attention in order to determine the geography of the underwater surface.
Learn the movement of the bottom line
Now you need to closely look at the bottom of the screen in order to find out the line that is running. This line enables you to know the bottom of the water surface you are on. The line can also be adjusted even if your boat is not moving at all.
Well, it’s not something to worry too much about, just go through the line from left to right. If the line indicates any slope going upward, this means that your boat is moving toward shallower water. And If the line depicts that the slope is going downward, your boat is moving toward deeper water.
Furthermore, The coarseness of the underwater surface is identified through the thickness of the line. The rule is simple: the coarser the surface is, the thicker the line will be. Please keep in mind that with the side imaging fish finders, you would probably face some difficulties in determining the geography of the underwater surface. The case is different with bottom line fish finders as they are good for it.
Focus on the readings
This is the most important part where you need to focus on the screen above the surface indicating lines. This section of the screen indicates the water between the underwater surface and the water surface. The hook signs that are visible on the screen show you the fish. The size of the fish will determine the appearance of the hook, so, if the fish is large in size the hook will also appear in large size.
Now look for the place where most of the fishes are then find out how far below the water surface that place is. It would be better to locate the exact position of the fish in order to determine the right place for fishing.
- What Do You Need for Fishing - August 18, 2022
- How to Find Offshore Fishing Spots - August 18, 2022
- What to Use for Trout Fishing - August 17, 2022