 How to read fish finder images is absolutely dependent on making your fishing trip incredibly successful. Or better claim, you will be using the fish finder at its maximum possibility if you know how to effectively read it.
Interpreting the fish finder images and using this valuable device for the first time is no less than trouble. And not accompanying this device, it is merely a matter of luck to catch a single fish or catch the hoards of fish but that cannot be predicted at all.
Not only the fish finder displays the presence of fish underwater, but it would also converse a good deal of time to better utilize the fishing time without causing any frustration.
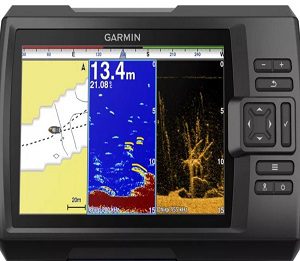
How to Read Fish Finder Images to Cast at the Right Spot
Do not take the fish finder screen any complex. And we do advise you not to take it on your next fishing trip if you do not know how to read the fish finder images to save yourself from facing an ordeal.
Stick with us and find all the basics for the good read to know when and where to cast for optimized fishing!
The Basics that Create a Fish Finder Images
The creation of the fish finder images involves very few basic terminologies and reading to ensure what’s underwater through the sending and receiving of sonar waves.
A transducer that contains the sonar technology which is capable of sending the beam down the water in a set of cone formations which then transmits the raw data back to the fish finder device. There, the fish finder device then classifies the data and shows exactly what everything is about.
So, this is the first part of how the fish finder collects the data from the bottom of the seabed. Now, it is time to dig out what data it interprets and what we read on the screen.
Let us classify the other parts of the data that complete the purpose of fish finder images but make certain that all of the fish finders come with almost-same the basic features which we will discuss here. Your particular fish finder model may contain more features but not less than what we have.
Depth
It best detects the water depth, shows it on the screen, and is certainly reliable to trust what it finds out.
And the depth limit is the one claimed by the brands that sell the fish finder devices. So, you can have a fish finder offering between 150-ft to up to 2,000-ft (possibly more.)
Temperature
The temperature reading shows what the underwater situation is. It displays the reading in Celsius and Fahrenheit formats, so you can toggle to either setting per your choice.
Take note, the underwater temperature will be totally different from the outside but if it is warm or cool, the fish finder will actually define the spot. 🙂
Speed
And the speed tag tells you how fast you are moving up on the water (or better say the transducer attached to your boat.)
But here is a piece of caution we should always enlighten: Lower the transducer into the water when you are really into the mood of fishing and not when you are trying to reach a certain point to start fishing.
If the transducer is down and you are riding the boat at high speed, it may clip out off the mount or break in the worst-case scenario.
Identifying Fish on the Fish Finder Images
Apart from the Depth, Temperature, and Speed up on the fish finder screen, the next thing comes how to effectively identify the fish.
But spotting the fish is one thing, the primary part is identifying the fish through its size and possibly its type.
As the sonar beam goes downward in a cone shape, the identification of the fish could go super tricky. And when there is no fish detecting by the sonar waves, the sound waves would be bouncing back to the transducer by hitting the seabed without showing anything on the screen other than the possible objects located on the surface (rocks, cliffs, holes, bushes, coral reefs, and more.)
Learning the Fish Arch
Some of the fish finders support finding the fish in an arch format where the bigger of it in size represents (probably) the larger fish howling around.
On the other hand, the small-sized arch means the fish could be small in its size. Most anglers opt for such a fishfinder due to its popularity and ease of use (when one gets used to it.)
The fish may show in a full-arch when it swims right into the cone and may look to be half-arch when it is not in the middle of the cone. So, do not take the half-arch as the fish is small enough. So, learn to understand that half-arch is the confirmed half-arch with a good thickness which may land you to catch the large fish.
Going with Fish ID
Well, it seems quite easy to operate such a fishfinder showing the Fish ID instead of judging the size on your instincts.
This Fish-ID technology is the real painstaking system that displays the fish according to its size. But that may easily turn out to be a mess if the fish finder detects a school of fish and rather takes it as the plants found underneath.
But it is just a matter of practice, and you would easily determine what seems to be a fish and what is a plant down in the water.
There are selective fish finders that support Fish ID technology, so always ask the vendor if you are purchasing the fishfinder to retain this exclusive feature.
Conclusion!
The fish finder images are literally a complex process but with time, you will eventually get better at how to read fish finder images to improve your fishing experience.
We will never recommend going fishing without a fishfinder, and then we will also never recommend going with it without exactly knowing what shows up on the screen.
Happy fishin’ with the fishfinder! 🙂
- What Do You Need for Fishing - August 18, 2022
- How to Find Offshore Fishing Spots - August 18, 2022
- What to Use for Trout Fishing - August 17, 2022