 When fishing in the peak summer on any water, be it fresh or saltwater, and the moving or static water, there is a much common problem the anglers face.
Just like the insulation, the outer body of the water takes all the heat absorbed and yet is hot enough to even touch it.
And as you slide inward and reach a certain depth, the water gives the feel of hot and cold water due to the heat the water surface is absorbing, channeling downward and keeping the deep layer of the water pretty much warm and cold.
Then comes the deeper depth which hardly gets an impact of the outer temperature because of being at depth, the warmth does not reach this much level.
No matter what time of day it is, the heat (with lowered and increased intensity) will put havoc on the outer surface of the water.
This change might not be detectable by humans but the fish are pretty prone to the temperature. The more the heat, they would dive deep down the water making you catch them somewhat challenging.
And the remarkable thing is, we can easily detect the thermocline on the fishing trip without involving too many nerdy devices including the exact steps of how to find the thermocline on a fish finder!
This little detail can really transform your entire fishing experience, and you can then fish even in the hot scorching afternoon.
Table of Contents
What is Thermocline?
A buffer or you can call it a layer between the upper water surface and the lower water touching the floor.
Imagine there is a lake having a maximum depth of 100 feet with static water where the thermocline layer (may) commences at the depth of 50 feet and last to 70 or 80 feet. The rest of the water level (last 20 or 30 feet) remains unaffected by the warmth of the water surface as well as the thermocline.
That thermocline layer of up to 20 to 30 feet is the one that registers the variation of temperature where the upper part of it meeting with the surface water could be much warmer than its middle part but the lower part of it that meets with cold surface water has a considerably lower temperature from the middle of the thermocline.
All in all, the thermocline goes with the highly-interchangeable temperature where fish super like to swim.
And it (thermocline) will hardly mix with the deep water due to its thick composition but it is very much the mixed layer of the surface water that bears about the same temperature as that.
The thermocline may extend to a larger volume on the static water like the lakes and ponds absorbing the direct sun heat. Whereas the situation will keep changing with the water being flown like the streams, rivers, and oceans increasing and decreasing the level of the thermocline.
How to Find the Thermocline on a Fish Finder
Well, it is super easy to find the thermocline on a fish finder. And the first attempt is to go with your inner intuition.
Finding Thermocline with 2D Sonar-Backed Fish Finders
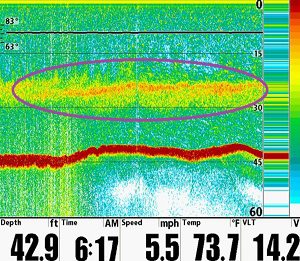
CHIRP 2D Sonar is the best way to detect the existence of thermocline than many other sonar systems.
Regardless of the width of the thermocline, the entire layer will be shown in the horizontal form which you can easily notice on the colored as well as the gray-colored screen.
The colored display will display the thermocline in the orange and red horizontal band from one end to the other hand.
Whereas, the gray-colored screen shows the thermocline as in the grayish darkened lines but will be considerably thick to notice.
Finding Thermocline on Down Imaging
Looking for the thermocline on down imaging is somewhat difficult — you have to constantly tune in and tune out the sensitivity to detect it, even lowering the brightness of your fishfinder.
But the good thing is, the thermocline is always in (around) the middle of the water body, so you can fine-tune the sensitivity plus brightness to get it detected.
Once the setting is met, you can then get to see the horizontal long band with dots and lines (depending on the quality of the fish finder device) going from one end to another.
Finding Thermocline with Side Imaging Sonar
Now, it is super complex to notice thermocline with a side-imaging sonar system but you need to keep a hawk-eye and a good sense of color changes to ensure you got the thermocline detected.
As you increase and decrease your sensitivity, as well as the brightness, can get you to easily distinguish its existence.
The rather dark grayish strips on both sides are the proof you have the thermocline locked on the fish finder display. As you lower the brightness, this will make it more visible.
Finding the Thermocline with Fish Strolling
Do you see the majority of fish strolling on a certain level of depth? Yes, that commonly happens in the peak summer when the fish are found to be swimming in the middle depth of the water — this is (most probably) the thermocline layer and the first step to judging its existence.
Conclusion!
How to find the thermocline on a fish finder means you have good command over the fish finder device, and we mean it!
And when you get the thermocline on your radar (fishfinder display), that is the prime water layer where fish strolls around.
But the thermocline layer comes with a problem — the static lakes, reservoirs, and ponds have the most width of it whereas the water resources like the ocean and river have fewer chances of having thermocline or probably the width will be lessened for sure.
Let’s make yourself the master of detecting the thermocline, and enjoy catching the hoards of fish! 🙂
- What Do You Need for Fishing - August 18, 2022
- How to Find Offshore Fishing Spots - August 18, 2022
- What to Use for Trout Fishing - August 17, 2022